Completion of eCRFs in the RAYLYTIC Platform
Aim
The purpose of this article is to describe how to electronically collect Case Report Forms (CRF) data using the RAYLYTIC Platform.
Procedure
CRFs can be completed in two different ways:
Option 1: Live data capturing tool “Start ePRO/CRF” for pending CRFs
Step 1: Select the Menu section “Start ePRO/CRF” (Figure 1).

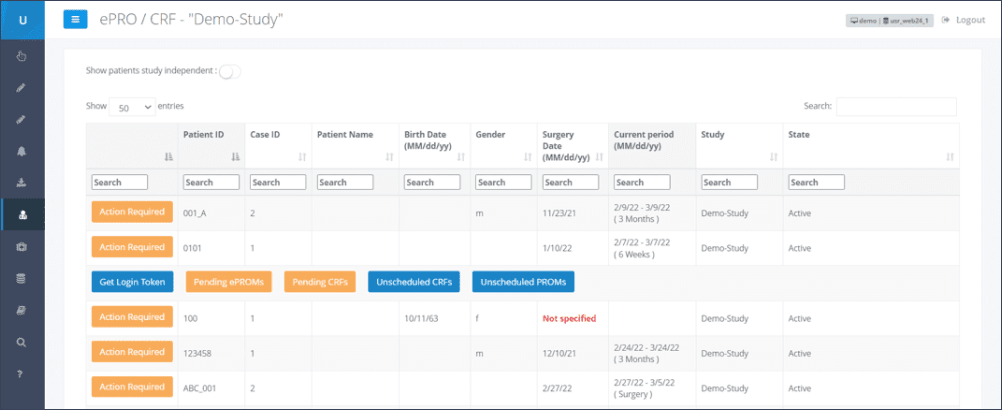
Step 2: A table appears with an overview of the questionnaire status of the patients. A specific patient can be selected by using the search tool in the upper right corner or by scrolling through the patient list. If questionnaires are pending for one patient, a yellow-labeled button “Action required” is shown next to the patient ID (Figure 2).

Step 3: By clicking the button “Action required”, information about pending ePROMS as well as eCRFs are displayed. If CRFs are pending, another yellow-labeled button “Pending CRFs” is visible.
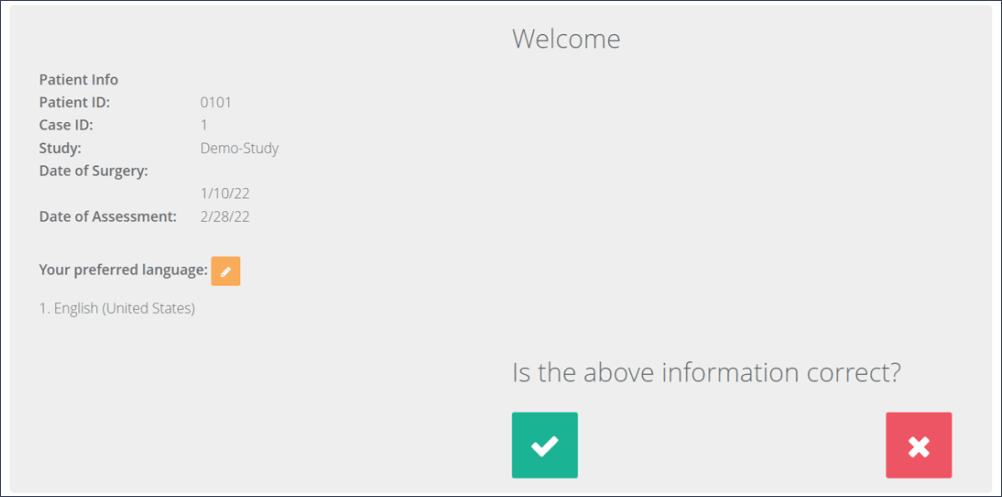
Step 4: To complete pending CRFs, the button “Pending CRFs” needs to be clicked. A welcome page to confirm the correctness of the patient’s details will appear (Figure 3). After confirming with the green checkmark, the questionnaire can be filled out.

Option 2: Retrospective or live data capturing via “Study Overview” / “Questionnaires”
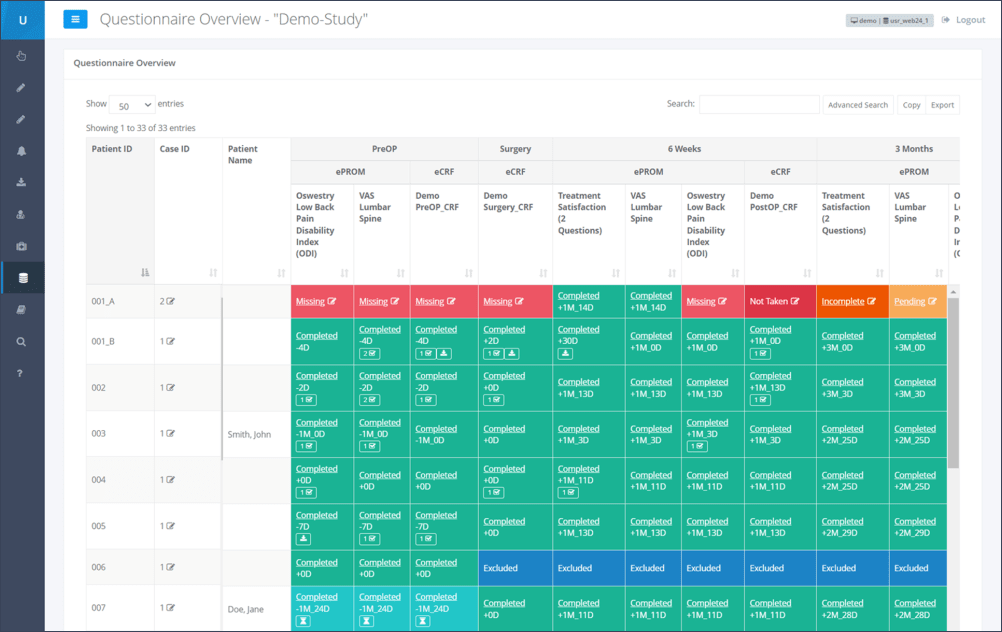
Step 1: An overview of questionnaires belonging to a study (PROMs and CRFs) is displayed in the Questionnaire Overview. Each row of the upcoming table represents a specifc patient and each column is a questionnaire that is required for a specific time point (as visible in the header of the table). If the follow-up time point for the questionnaire is ongoing, the cells for the specific patient and questionnaire will be displayed in yellow as “Pending”. In case the follow-up period has already ended and no data was entered in the RAYLYTIC Platform for that questionnaire, the cell will be displayed in red with the tag “Missing” (Figure 4).

Step 2: To complete a questionnaire, one has to click on “Pending” or “Missing”. First the date of assessment needs to be entered. This means the date when the questionnaire originally was or is completed (Figure 5). Following this, an indication is displayed whether the date fits into the follow-up window of the study.

Step 3: By clicking “Proceed”, the questionnaire appears and can be filled out.
Step 4: After entering all answers, the questionnaire can be transferred to the system by “Submit” at the bottom. The user will be redirected to the Questionnaire Overview and the cell that was previously either yellow or red will now be displayed in green (“Completed” within the study visit time window) or turquoise (“Completed”, but outside the study visit time window).
If the data entry has to be paused and continued at a later time point for any reason, a questionnaire can be saved with missing answers. Then the cell will be displayed in dark orange with the tag “Incomplete”. To complete this questionnaire, click on “Incomplete” in the relevant cell, which will lead to the results overview of the previous answers. To continue the data entry, one must now click on the “Edit” button in the header of the results overview. The window for entering the date of assessment will open again. If you now click on “Proceed” you will get to the questionnaire to enter the missing answers. Clicking the “Submit” button will then submit the completed questionnaire to the database. When all mandatory questions have been answered, the questionnaire will be displayed in green or turquoise, depending on the time period in which it was answered.
Updated on 13 Sep 2023
