Configuration of Validation Rules
Aim
This article briefly describes how to configure (add, edit and delete) validation rules.
Validation rules can be designed to increase the consistency of data entries in questionnaires by issuing different types of warnings when inconsistent data is entered to the database.
An additional permission “Edit Validation Rule” is qualifying users to be able to configure Validation Rules in the UNITY Platform.
Three main types of validation rule can be configured within the database:
Check for Question specific answers, numbers, or dates
Comparison between two answers, numbers, or dates in different questionnaires or between examination periods
Comparison between two answers within a multiple select question
Procedure
Creating a new validation rule
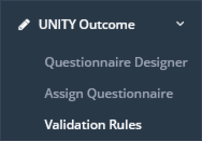
Step 1: Go to the menu section “UNITY Outcome” and subsection “Validation Rules” (Figure 1).

Step 2: Add a new validation rule by clicking the blue button (Figure 2).

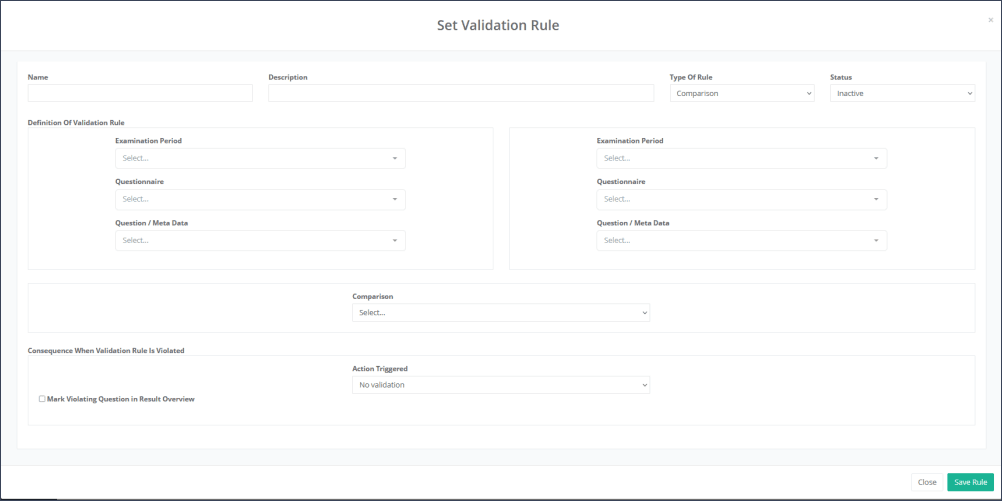
Step 3: A pop-up window will be opened. Please complete all of the following information:
“Name”: Add a brief name of the rule
“Description”: Add a description of the rule (will be shown in case of rule breach in the “Data Validation overview”)
“Status”: Define the status of the rule: active or inactive
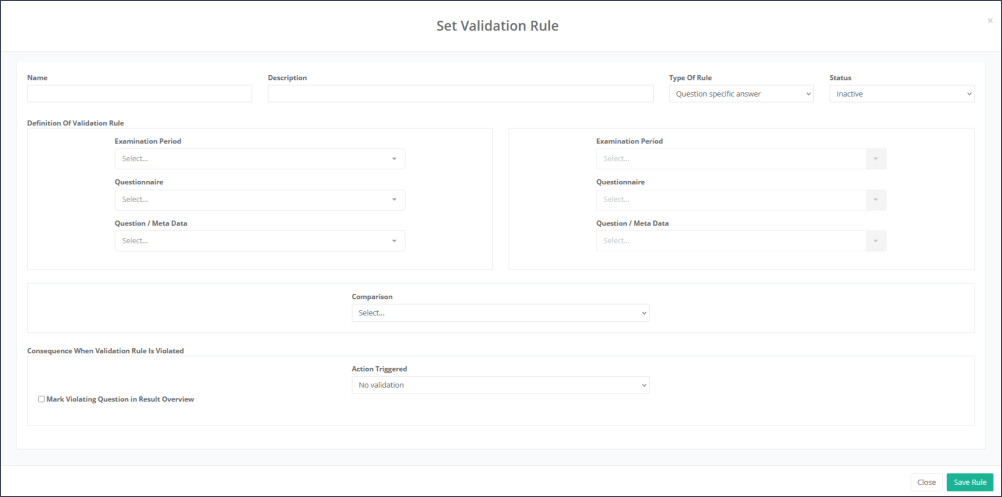
“Type of Rule”: Decide whether the rule should compare two answers with each other (Type: “Comparison”) or use a single answer (Type: “Question specific answer”) to check for inconsistency.
Step 4: The corresponding questions and answers are to be defined under the section “Definition Of Validation Rule”.
Please note: Validation rules must always be defined true in order to indicate a violation of the rule.
a) Creating a new validation rule: Type Comparison
Complete all required fields with the following information for the left side (Questionnaire 1) and the right side (Questionnaire 2) separately:
“Examination period”: Select the examination period of the questionnaire of interest
“Questionnaire”: Select the questionnaire of interest
“Question/ Meta Data”: Select the question of interest
“Answer”: Select the answer of interest
“Comparison”: choose between different types of comparison: for comparing two text answers choose the operators “and” and “not and”; for comparing number or date input answers the operators “equals”, “unequal”, “<”, “>”, “<=” and “>=” can be used to define the validation rule (Figure 3).

b) Creating a new validation rule: Type Question specific answer
Complete all required fields on the left side (Questionnaire 1) with the following information:
“Examination period”: Select the examination period of the questionnaire of interest
“Questionnaire”: Select the questionnaire of interest
“Question/ Meta Data”: Select the question of interest
“Answer”: Select the answer of interest
“Comparison”: choose between different types of checks: for checking the text answer choose the operators “equals” or “unequal”; for checking a number or date input answer the operators “equals”, “unequal”, “<”, “>”, “<=” or “>=” can be used to define the validation rule (Figure 4).

Step 5: The action resulting of a violation of the defined rule is to be defined under the section “Consequence When Validation Rule Is Violated”. Please select one of the following types in the dropdown menu “Action Triggered”:
“No validation”: No warning message appears for the user completing the questionnaire, but is visible as a rule breach in the “Data validation overview”
“Warning validation”: A warning message appears immediately after entering the specific answer for the user completing the questionnaire, the message can be defined under “Validation message” (Figure 5), the user can still save or submit the questionnaire with the data that has caused a rule breach. The breach is also visible in the “Data validation overview”
“Enforce valid input”: A warning message appears immediately after entering inconsistent data for the user completing the questionnaire, the message can be defined under “Validation message”, in this case the user can NOT submit the questionnaire with the data that has caused a rule breach.

Step 6: Optional: To visualize the question with a rule breach at the questionnaire results page of the corresponding questionnaire with an exclamation mark sign, the checkbox “Mark Violating Question in Result Overview” must be selected.
Step 7: Click on “Save” to save the configurations for this validation rule.
All types of the validation rule breaches described above are listed in a table under the menu section “Study overview” / subsection “Data validation overview”, which is explaind in detail in this article.
Edit or delete existing validation rules
To edit or delete an existing validation rule either one of the buttons at the right hand side of each validation rule can be clicked: The blue button (pencil icon) to edit a rule and the red button (recycle bin) to delete a rule (Figure 6).

Export of defined validation rules
By using the button “Export” and subsequently “Excel” all defined validation rules are exported in an excel file.
Updated on 24 Jul 2023
