Create a patient
Aim
The purpose of this article is to describe how to add a new patient to a study.
Procedure
Step 1: Patients can be added under the menu section “Study Overview” and the subsection “Patients”.
Step 2: In the subsection “Patients” the blue button on the top left corner with the plus sign needs to be clicked to start entering the new patient’s details (Figure 1).

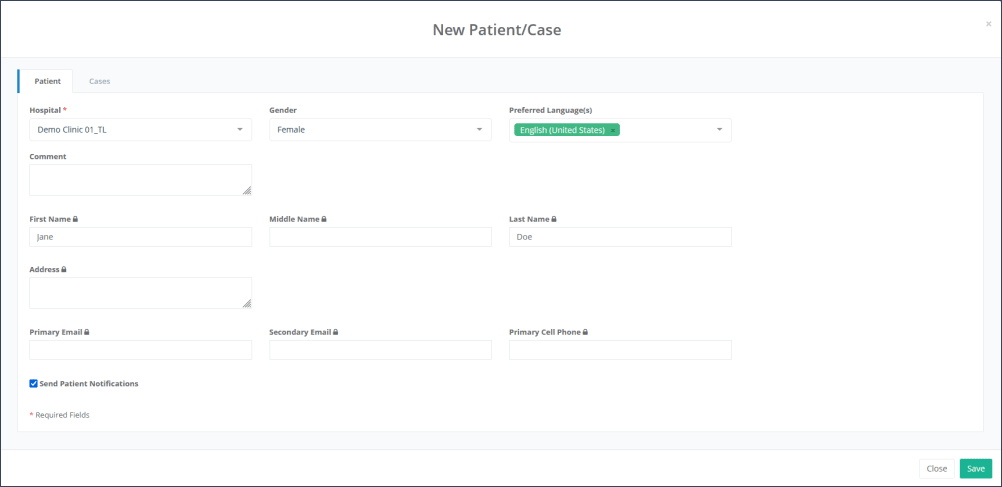
Step 3: A dialog box containing the two tabs “Patient” and “Cases” will open. Under the tab “Patient” (Figure 2) the “Hospital” has to be selected, which is a required input. Further, patient specific data can but do not have to be entered as follows:
Patient’s “Preferred Language(s)": which is important in case of using ePROMS in different languages to display the questionnaire in the correct language to the patient.
Entering patient´s personal data (“Name”, “Gender” or “Address”) should be done according to local guidelines. All fields with the padlock symbol are encrypted and can only be seen by site users of the site to which the patient belongs.
“Comments” can be added for further patient information.
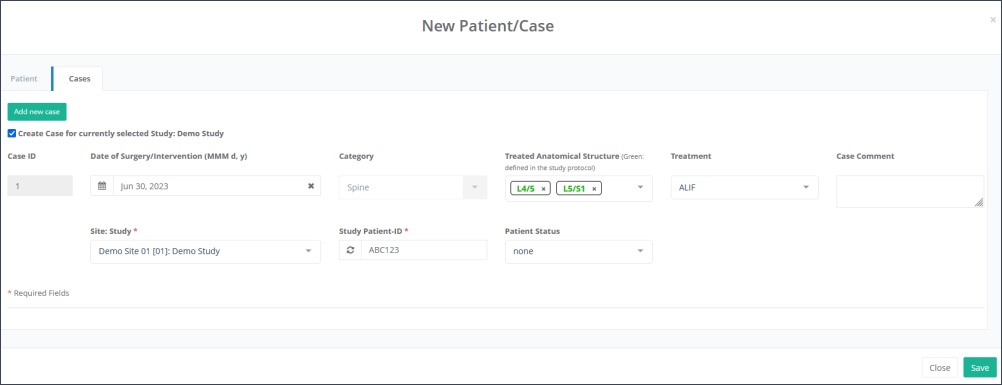
Step 4: Under the tab “Cases” (Figure 3) the study site, Patient ID and surgery-related information can be entered as follows:
The “Date of Surgery/Intervention”: Click the calendar icon to select a past or future date.
The field “Category” is preselected for each study.
“Treated Anatomical Structure(s)” can be added using the drop down menu by clicking on the corresponding structure. In case of entering more than one treated anatomical structure (e.g., L4/5 and L5/S1) the dropdown menu needs to be clicked a second time with subsequent selection of the next treated anatomical structure. Structures marked in green colour are within the scope of the study. Structures in red colour can still be chosen if necessary.
For defining the “Treatment”, the specific procedure can be selected using the drop down menu.
Selecting a “Site: Study” and entering a “Study Patient-ID” is required (as marked with a red asterisk) for creating a patient. The patient ID is a unique identifier for a specific patient of a site. The site ID is not visible to a site user, but pre-defined and does not need to be entered into the “Study Patient-ID” field. It is recommended that the patients are numbered sequentially (e.g., patient ID: “01”, “02”, “03”). If applicable, also a sequential patient numbering can be used by clicking on the sequential mode icon. Additionally, the patients can also be numbered according to a unique patient ID from a PACS-system or any other desired unique ID.
The “Patient Status” is “none” by default. Should the patient status need to be changed, for example to “excluded” or “lost”, this can be done via this drop down menu.
In order to assign a second “case”, when a second surgery is performed on an enrolled patient (e.g., left hip and right hip surgery), the green “Add new case” button must be clicked and completed with the appropriate information, similar to the first case.
The checkbox “Create Case for currently selected Study” is typically checked by default.
Click on the green “Save” button to save the newly created patient.


Updated on 18 Sep 2024
