Designing a questionnaire
Aim
The aim of this article is to describe the different types of questionnaires and how to create a new questionnaire or edit an existing one.
Questionnaire types
Patient-reported outcome measures (PROMs): A questionnaire that will be answered by patients.
Case Report Form (CRF): These are questionnares that need to be filled out by a physician, e.g. diagnostic information or adverse events (AE).
Combination of both PROM and CRF: These are questionnaires, which contain both; questions directed at the patient and questions directed at the physician.
Note: In order to simplify this article, all these instruments will be referred to as questionnaires. When a specific step applies to only one of these questionnaires, the specifics will be clarified.
Procedure
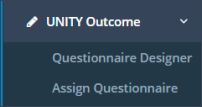
Step 1: Please choose your study and then navigate to the menu section “Outcome"and subsection “Questionnaire Designer”.
Step 2: To edit a questionnaire, you can select the specific one in the drop-down menu directly underneath the heading: “Please choose a Questionnaire”.
Step 3: A new “ePROM”, “eCRF”, and/ or the combined form - “ePROM/eCRF” can be created by selecting the corresponding button.
Step 4: General information that is required when a new questionnaire is added:
“Name”: Please enter the complete name of the questionnaire. This will be displayed in the questionnaire designer
“Abbreviation”: Please enter a shortened name of this questionnaire which facilitates clarity in the Questionnaire Overview
“Orientation for tablets and phones”: If it is planned to answer PROMs on the tablet, the orientation of how the questionnaire is displayed can be set here. With the “Auto” setting, the display adapts to the orientation of the tablet. With the “Landscape” and “Portrait” settings, the questionnaire is always displayed in the selected orientation, regardless of how the tablet is held.
“Copyright”: Please enter the source of your questionnaire. For PROMs, this will be visible at the bottom of the page when entering data
“Internal Comments”: Please enter a short description of the questionnaire’s purpose and/ or the current version. This information will be visible within the Questionnaire Designer only.
“Visibility”: There are two options from which you can choose: “Private” and “Public”. Private questionnaires will only be available for studies of the same Sponsor, for which it was created. Public questionnaires, such as common validated instruments will be available for selection for any study in the RAYLYTIC Platform. If you plan to use such an instrument, please contact RAYLYTIC.
“Language”: Choose the language(s) this questionnaire shall be available in. Make sure to click on “Enable” right next to the “Language” drop-down list to activate the language of the questionnaire.
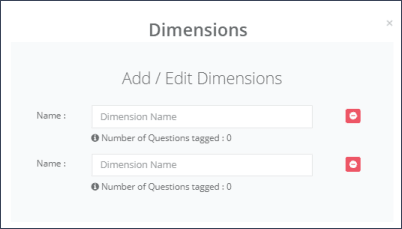
“Dimensions”: If a Questionnaire needs to be divided in “Dimensions” (e.g., for specific scoring methods) the dimension(s) need to be created first. Click on “Dimensions” and enter a name for each dimension. Multiple dimensions can be created at once. Click on “Add Dimension” to add additional dimensions. To remove a dimension, click on the red minus sign next to the dimension (Figure 2).
“Permissions”: Users who have access to the study can also be assigned permissions in the questionnaire designer. If you want users to be able to read a specific questionnaire here, drag it from the “Users with No Access” box into the “Read Access” box. If a user should also be able to edit the questionnaire, drag it accordingly into the “Read/write Access” box.
Please Note: A questionnaire can only be saved if at least one user has either read or/and write access and if at least one (test)-site has been assigned to the study.
Step 5: In each questionnaire, items can be added by clicking on “Add Question”. Either a new question can be created or a question can be copied from an existing questionnaire assigned to the Sponsor.
To copy an existing question, select “Choose from existing”, choose the desired questionnaire from the dropdown menu that appears, then select the desired question and confirm with “Choose”. The selected question will then appear in the questionnaire designer. It is still linked to the original question. This means that if the original question is edited, the copied question will also be changed.
When creating a new question or editing an existing question, there are several fields to be filled:
“Question”: Type in the question text
“Answer type”: Select one of the types of the list, which will be explained below
“Autoselect from Database”: default None , only applicable for associated clinics
“Table”: default None, only applicable for Single and Multiple select questions, will be explained below
“Mandatory”: this question cannot be skipped and needs to be answered
“Pre-Populate previous answers”: If questionaires will be used multiple times within a study, questions can be pre-populated with answers given previously
“Accessible for role”: applies only to eCRFs or combined ePROMs/eCRFS; questions can be made available for sponsor users only to answer; then set from “Default” to “Sponsor”
The field “Dimension” is only applicable if dimensions are necessary and were previously created.
There are nine types of questions which are defined by the possible answer options:
Information: No answer is required. This type of “question” can be used to display welcome messages, give instructions on how to answer a questionnaire or display sub-headings to longer questionnaires.
Single select: This is a question with several pre-defined answers where only one answer can be chosen. For this type of question, it is necessary to enter the answer options from which the patient chan choose, below the question. It is also possible to enter a score for each answer by clicking on the blue button “Enable Scoring”.
Multiple select: This is a question with several pre-defined answers where multiple answer options can be selected. Also for this type of question, it is necessary to enter the answer options. As for single select questions, it is possible to enter a score for each answer.
Visual analogue scale: If the question requires an answer on a visual analogue scale, the minimum and maximum values of the scale need to be set. Additionally, a slider start and end description will be displayed for the patients to indicate, for example, whether a “0” means no pain at all, or the worst pain imaginable. The answer value of this scale is automatically treated as a score.
Number input: This type of question allows only numbers to be entered. It is also possible to choose the minimum and maximum value so that, for example only values from 1 - 5 can be entered by the patient. For this answer type you should ideally also select units. The main unit should be chosen from the drop-down menu, e.g. “Length: inches” , and when there are more than one options possible for the patient to fill in the number, e.g., meters or centimeters, additional specifications can be added to the units.
Date input: This type of question allows a date and/or month and/or year to be entered, depending on the format defined here.
Time input: This question is used to collect a time of day, e.g. the time at which a surgery started.
Date Time input: This question is a combination of the Date and Time input types. Please note that this answer type does not allow you to choose a date format. It will always be: day, month and year.
Text input: This type allows you the entry of a free text.
Step 6: Starting from the second question, an additional field “+ Dependency” is displayed. Here it is possible to set the question so that it is subordinate to a previous question, i.e. it appears only if a certain answer (or multiple answers of this one question) were selected in one of the previous questions.
Step 7: To create tables, click on “Tables” and enter a name that appears in the Questionnaire Designer to assign questions, as well as a “Group Title”, which is then visible as a table heading in the questionnaire. Then click on plus to add the table. The first question of this table must be created normally with all answer options. This can be done for either select single or multiple select questions, which have the same answer options and if applicable the same scoring. To assign other questions to this table, select the desired “Table” in the question menu and all answers are then pre-populated by the first table question.
Step 8: To create and edit a “Scoring” method for questionnaires, you have predefined options which you can find in the drop-down menu “Predefined Parameters”, such as “Total score of answered questions” or “Total possible score”. However, you also have the option to enter a specific formula yourself. For further instructions, please contact RAYLYTIC.
Information: The ID field is not editable, it is a unique ID for this scoring method. The scoring method can be applicable to the whole questionnaire (Questionnaire specific option of the drop-down list) or a specific dimension (Dimension specific option of the drop-down list).

Step 8: Please ALWAYS remember to save ANY changes done to the questionnaires. Otherwise the changes will be lost!
Please note: Before a questionnaire can be answered by a patient, it must be assigned to an examination period of the study. Please refer to the article Assignment of Questionnaires.
Updated on 13 Sep 2023