Questionnaire Overview
Aim
The purpose of this article is to explain the questionnaires' overview table.
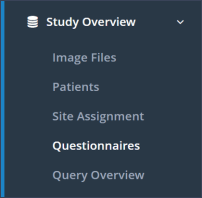
The overview of questionnaires belonging to a study (ePROMs as well as eCRFs) in the RAYLYTIC Platform can be found under the menu section “Study Overview” and subsection “Questionnaires” (Figure 1).

Explanations
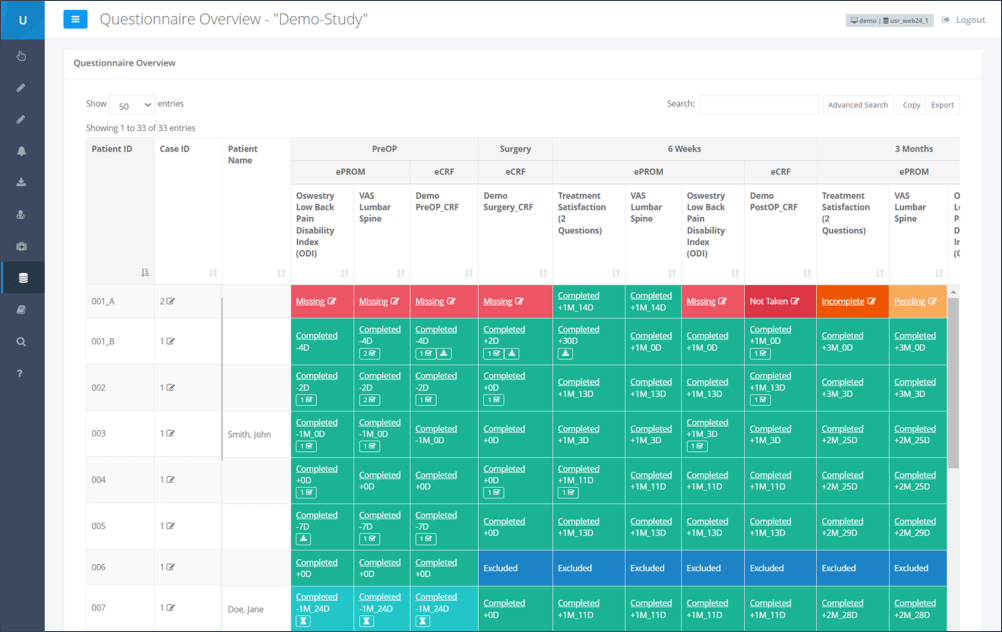
The “Questionnaire Overview” is presented in form of a table. In the header of the table the respective time points of the visits are shown (e.g., 6 weeks) that are required for the selected study. Below, the questionnaires assigned to these points in time, separated for ePROMS and eCRFs, are listed. Each patient is then represented in a single row with each cell representing the status of the questionnaire at the respective study time point (Figure 2).

Questionnaire status
Each cell in the table is colored according to the status of the questionnaire. The meaning of each color is described below:
Green cells “Completed”: The questionnaire was successfully completed within the predefined time frame of the study visit. It is also shown how many Years_Months_Days (“Y_M_D”) after ("+") or before ("-") the surgery the questionnaire was answered. Clicking on “Completed” will direct the user to the results of this specific questionnaire.

Turquoise cells “Completed” : The questionnaire was successfully completed, but outside the scheduled time frame specified in the study design. Again, a click on “Completed” will directly take the user to the results of the questionnaire.

Orange cells “Incomplete”: If a questionnaire cannot be filled out completely, for example because data is missing or data entry is interrupted, it can also be saved incomplete. By clicking on the incomplete you can display the answers entered so far. To complete the questionnaire, click on “Edit” in this results overview and enter the missing answers.

Light red cells “Missing” : The questionnaire is currently missing, once the follow-up period has already ended and no answers were entered in the database. Clicking on “Missing” will still allow the site user to answer the questionnaire for the specific examination period.

Red cells “Not Taken”: If the questionnaire was certainly not answered, the status can be changed from “Missing” to “Not Taken”. Therefore, the user has to click on the small pencil icon next to “Missing” and a pop-up window, titled “Questionnaire Status change” will appear. The status of the questionnaire can now be changed from “Missing” to “Not Taken” using a drop-down list. Subsequently, a comment has to be entered.

Yellow cells “Pending”: These cells show a currently open time frame in which questionnaires can be completed. Clicking on “Pending” will allow the user to answer the questionnaire for the specific examination period.

White cells “Scheduled”: These cells show the upcoming follow-up periods for each patient and time point. These cells will automatically turn yellow (“Pending”) when the follow-up period starts and light red (“Missing”) when the follow-up period ends and no data has been entered for that questionnaire.

Filtering lines
To view specific results for one patient, the table can be filtered using the “Search” tool in the upper right corner (Figure 3).

Furthermore, the table can be sorted using a specific column. By clicking on the arrow symbol in the desired column, the table’s entries will be sorted accordingly to this column (Figure 4).

Downloading this table
This table can be downloaded as an Excel-file by clicking on “Export” and subsequently “Excel” in the upper right corner.
Updated on 13 Sep 2023
