UNITY Platform
Aim
The aim of this article is to provide new users with a brief introduction to the UNITY Platform and its organization.
The UNITY Platform
The UNITY Platform is a study database, specifically tailored for clinical trials. Its functionality is related to
Clinical trial planning and monitoring
Medical image transfer and analysis including anonymization/pseudonymization
Patient Related Outcome Measures (PROMs) and Case Report Forms (CRFs)
Statistical results analysis
The UNITY Platform complies with GCP, 21 CFR part 11, HIPAA, GDPR and the FDA guidance document for software in clinical trials.
The UNITY Platform has two different instances that can be accessed:
The UNITY LIVE Platform on which patient data can be entered, images uploaded and questionnaires completed amongst others. The URL for this page is the following: https://unity.raylytic.com/
The UNITY DEMO Platform on which it can be learned how the UNITY Platform works. Every step concerning entering of patient data up to the configuration of a study can be tested and practiced here. The UNITY DEMO Platform is irregularly overwritten with a copy of the UNITY LIVE Platform, so that entered data and configurations are not permanently stored here. The URL for this page is the following: https://unity-demo.raylytic.com/ (please note that for access to the UNITY DEMO Platform, the user needs to be registered on the UNITY LIVE Platform)
Logging in
To log in to the UNITY Platform, the user has to click on the link of the instance which should be entered and types in the login credentials.
Welcome Page
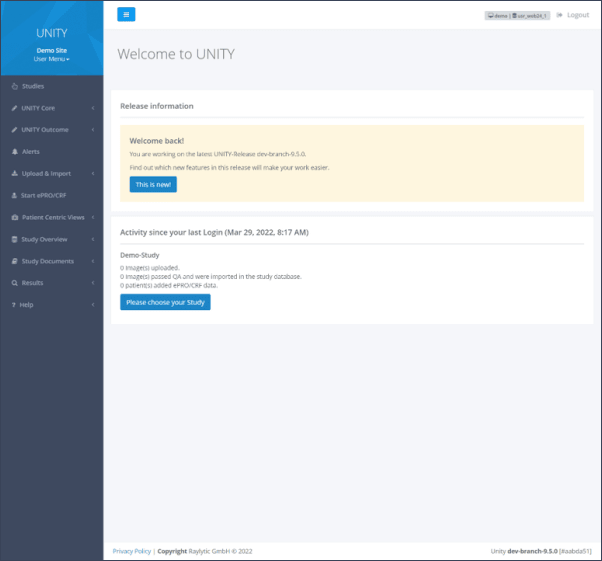
After successful login, the main menu is displayed on the left (Figure 1). The UNITY Platform is organized in menu sections and subsections. The menu sections are expandable to provide a better visualization. The subsections direct the user to specific pages.
User roles
A user of the UNITY Platform can have one of the following roles:
Site - staff such as medical practitioners and nurses, who are responsible for the clinical site
Sponsor - staff affiliated with a medical device manufacturer or a pharmaceutical company, university or hospital
Besides the user role, there are other permissions, a user can get additionally. The menu sections and subsections on the left change according to the user role and permission(s) a user has.
A description of the menu sections and when they are displayed, is shown below.
Studies
The first step after logging in is always to select a study under the “Studies” menu section. After that, the specific menu sections and subsections can be accessed. If a user has access to more than one study, all studies will be visible on a drop-down list. To switch to another study navigate back to studies and select the appropriate study from the list (Figure 2) .

UNITY Core: This menu section contains the subsections “Sponsor Administration”, “Clinic Administration”, “Study Administration”, “User Administration”, “Study Designer”, “Parameter Designer”, “Reference Designer”, “Add/Edit QCT Phantom” and “Edit Patient Centric View” (Figure 3).
Sponsor Administration: This subsection is only available for users with the sponsor role and a specific permission. Here the sponsor name can be edited as well as the welcome page (welcome message and logo).
Clinic Administration: This subsection is also only available for users with the sponsor role and a specific permission. Clinics that are participating in the study can be created here.
Study Administration: This subsection is only available for users with the sponsor role and a specific permission. In this subsection some study specific settings can be edited. For more information on these settings please contact RAYLYTIC.
User Administration: This subsection is only available for site and sponsor users with the specific permission. User accounts for the UNITY Platform can be created and configured. Furthermore, the access to individual studies as well as permission that a user has in these studies are admistered here.
Study Designer: This subsection is only available for users with the sponsor role and a specific permission. In this subsection it is possible to edit follow-up periods of a study and to define parameters that are to be measured in the study.
Parameter Designer: This subsection is only available for users with the sponsor role and a specific permission. Specific requirements to the medical image data that are necessary for the import of images and measurement of specific parameters on those images are defined here.
Reference Designer: This subsection is only available for users with the sponsor role and a specific permission. Here, appropriate reference periods of medical image data that are required for parameter determination are definable.
Add/Edit QCT Phantom: In the subsection “Add/Edit QCT Phantom” the QCT phantoms in the study can be managed.
Edit Patient Centric View: In this subsection, the user can compile an individual view of the patients included to date and view their outcome progression throughout the study.

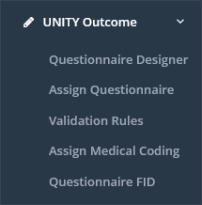
UNITY Outcome: This menu section contains the subsections “Questionnaire Designer”, “Assign Questionnaire”, “Validation Rules”, “Assign Medical Coding” and “Questionnaire FID” (Figure 4).
Questionnaire Designer: In the subsection “Questionnaire Designer”, questionnaires can be created or edited (including CRFs and PROMs).
Assign Questionnaire: In the subsection “Assign Questionnaire” questionnaires can be assigned study- or clinic-specific to a follow-up time period.
Validation Rules: This subsection is accessible for sponsor users with the appropriate permission. Validation rules for cross-form, within-form and question-specific validation checks can be defined and updated here.
Assign Medical Coding: This subsection is accessible for sponsor users with the appropriate permission. Medical coding, according specific questions in study-relevant questionnaires can be assigned in this subsection.
Questionnaire FID: Here individual field IDs can be defined for questionnaires, separately for questions and answers.
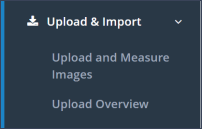
Upload & Import: This menu section contains the subsections “Upload and Measure Images” and “Upload Overview” (Figure 5).
Upload and Measure Images: In the subsection “Upload and Measure Images” one can upload DICOM images for a specific patient.
Upload Overview: In the subsection “Upload Overview”, the images that were uploaded by the user can be reviewed and, if necessary, edited or even deleted. If the upload process was interrupted, images will be displayed in the table “Images failed / upload in progress and available for editing”. The image files can be deleted to enable the restart of the uploading processes. Images in the subsection “Upload Overview” have not been reviewed by RALYTIC for image quality yet. After the quality check, the images will be imported into the database and can be accessed under the menu section “Study Overview” and the subsection “Image Files”.
Start ePRO/CRF: In the menu section “Start ePRO/CRF” site users can get an overview if CRFs or PROMs are pending for a patient. It is also possible to start completing a questionnaire on the local computer, e.g. a PROM in the interview mode or a pending eCRF. Further, token for completing a PROM via tablet mode or at home can be generated here (Figure 6).

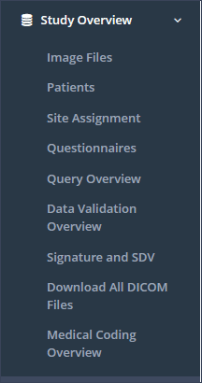
Study Overview: This menu section contains the subsections “Image Files”, “Patients”, “Site Assignment”, “Questionnaires”, “Query Overview”, “Data Validation Overview”, “Signature and SDV”, “Download All DICOM Files” and “Medical Coding Overview” (Figure 7).
Image Files: The subsection “Image Files” provides an overview of the images that have been uploaded, imported by RAYLYTIC and therefore passed a quality check. These images are available for further analysis.
Patients: In the subsection “Patients” all patients currently enrolled in the study, including their status (active, excluded, etc.) and their study-releated details (patient ID, treatment, date of surgery, etc.) can be found. Further, new patients can be added or existing patient data can be updated in this subsection.
Site Assignment: The subsection “Site Assignment” provides an overview of the sites participating in the current study. The sponsor user can also add new sites provided that he has the appropriate permission. Site users only see the site they belong to.
Questionnaires: In the subsection “Questionnaires” the user can get an overview of the questionnaires (PROMs and CRFs) that are required for specific time periods. Furthermore the status of the patient-specific questionnaires is visible (completed, missing, pending or scheduled). Retrospective data capture is possible by accessing this subsection.
Query Overview: In the subsection “Query Overview”, a table containing all queries that have been created for the current study is displayed. Moreover, queries can be directly accessed and answered via this overview. Sponsor users can resolve queries.
Data Validation Overview: In this subsection, the user can view violations of validation rules defined in questionnaires.
Signature and SDV: Here the user can find the current status of signatures and SDVs for questionnaire results.
Download All DICOM Files: In the subsection “Download All DICOM Files” a .zip file of all images in the study can be downloaded. Files currently listed in the “Upload Overview” will not be downloaded. This subsection is only visible for users with the sponsor role.
Medical Coding Overview: This subsections provides an overview about all answers given in questionnaires suitable for medical coding. Further, users with the necessary permission are able to add oder edit medical coding to these answers.
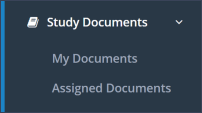
Study Documents: This menu section contains the subsections “My Documents” and “Assigned Documents”. This menu section requires a special permission for site and sponsor roles (Figure 8).
My Documents: In the subsection “My Documents” study documents can be managed (create documents, upload new versions and distribute them to other users).
Assigned Documents: In the subsection “Assigned Documents” the documents assigned to oneself by other users can be viewed and downloaded.
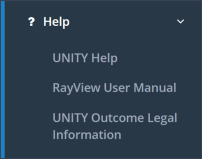
Help: This menu section contains the subsections “UNITY Help”, “RayView User Manual” and “UNITY Outcome Legal Information” (Figure 9).
UNITY Help: This subsection leads directly to the UNITY Help Page.
RayView User Manual: By clicking this subsection a PDF document “DHF 002 User Manual”, containing information regarding Raylytic’s DICOM Viewer RayView, will be generated.
UNITY Outcome Legal Information: By clicking this menu item a PDF document “Legal Information” will be generated.
Abbreviations
GCP = Good Clinical Practices
CFR = Code of Federal Regulations
HIPAA = Health Insurance Portability and Accountability Act
GDPR = General Data Protection Regulation
FDA = Food and Drug Administration
